6mm 8mm 10mm 12mm Instrumentation Stainless Steel Gas Ferrule Tee Tube Pipe Fittings Reducer
Composition of tube fitting
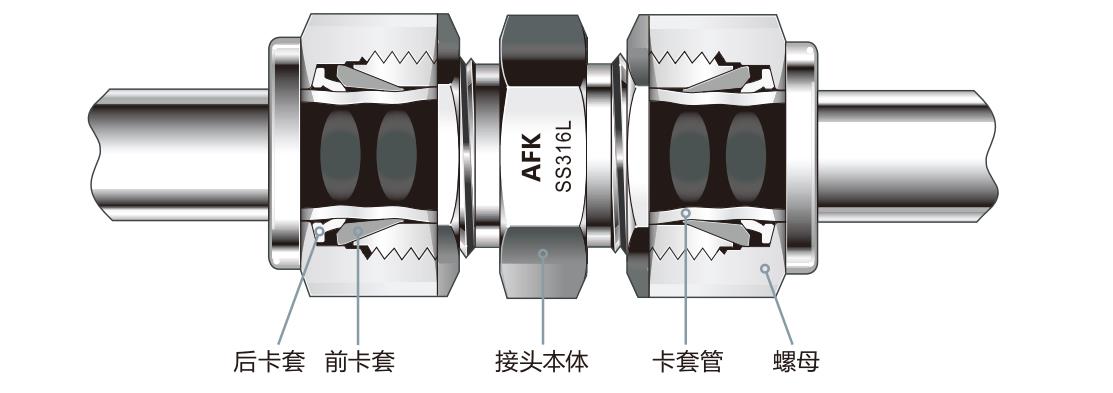
AFK tube fitting consists of four parts: front ferrule, back ferrule, ferrule nut and fitting body.
The advanced design and strict quality control ensure that the tube fitting is completely sealed under the correct installation.
Back ferrule Front ferrules Fitting body Tube Nut
Working principle of AFK tube fittings
When assembling a tube fitting (shown above), the front ferrule is pushed into the fitting body and tube to form a primary seal, while the back ferrule is hinged inward to create a strong grip on the tube. The geometry of the back ferrule helps create a cash engineering hinge-clamp action that converts axial motion into radial squeezing of the tube and requires minimal assembly torque to operate.
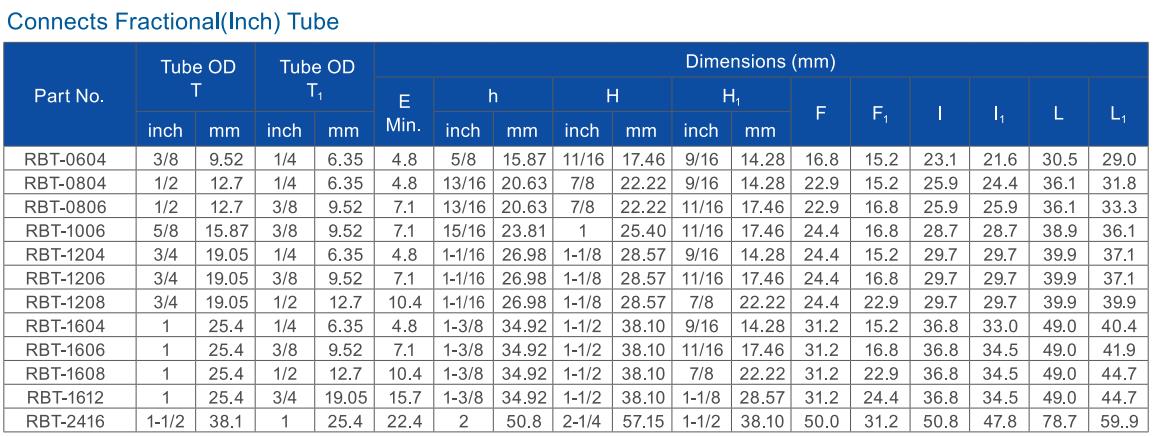
The dimensions of the ferrule tee structure marked with letters on the right correspond to the figure below
AFK tube fittings for Installation Instructions
AFK tube fittings require only hand tools for fast, easy and reliable installation
Installation Diagram
1in., 25mm and below AFK tube fittings
| 1.Insert the tubing completely into the fitting and against the shoulder, and finger-tighten the nut. High-pressure applications and high-safety-factor systems: Tighten the nut further so that the tubing cannot be turned by hand or cannot be moved axially within the fitting. |
2.Mark the nut at the 6 o’clock position |
3.Hold the connector body securely and tighten the nut one and a quarter turns to stop at the 9 o’clock position. |
Reassembly – all sizes
You can disassemble and reassemble AFK tube fittings many times over.
The system pressure must be removed before disassembling the AFK tube fitting.
| 4.Prior to removal, mark the tube along the back of the nut by drawing a line in the plane of the nut and fitting body. These marks are used to ensure that the nut is turned to the previously tightened position during reassembly. |
5.Insert the tube with the pre-assembled ferrules into the fitting until the front ferrule is on top of the fitting body. | 6.With the fitting body securely fastened, use a wrench to turn the nut to the previously fastened position indicated by the markings on the tube and body flats. At this point, you will feel a significant increase in resistance. Gently tighten the nut. |


